Supercannon II
Written by Ben
Last updated on 2015-12-24
Note: This guide has fewer step-by-step instructions. Supercannon II is a more advanced water gun. Building Supercannon II usually requires some sort of previous experience with PVC, so I'll assume my readers are familiar with PVC. If you are not, please read some of the tutorials in my air pressure homemade water gun guide to learn a thing or two. I do not explain everything in detail here and if this is your first attempt, you will miss important details about cutting/preparing PVC pipe, solvent welding, and safety in the APH guide.
Supercannon II is not intended to be shot at people or used in water wars. Unless your friends want to be shot with something with power equivalent to a small fire truck, don't use Supercannon II in a water war at full pressure with the full sized nozzle. Even if you build Supercannon II properly such that it has no risk of bursting, you still have the risk of the stream causing damage to someone or some property in some way. Large streams can cause blindness and internal bruising. Supercannon II is not meant to be shot at people ever. If you choose to ignore this warning, you do so at your own risk.
Supercannon II is the most powerful homemade water gun made yet. It boasts unparalleled range and water output on the same scale as a fire hose. Supercannon II performs nearly exactly like a fire hose.
Supercannon II was designed to improve upon the original Supercannon, which did not work very well. The main difference between the two is the Supercannon II uses a piston, while the original Supercannon used a tube that went to the bottom of a PVC chamber. The piston or tube were necessary because the air always floats on top of the water, so to fire a water gun at an angle without either solution, only compressed air would shoot from the gun. The original Supercannon had leaks and unusual problems with getting the water out the tube, so that idea was scrapped in favor of a piston design.
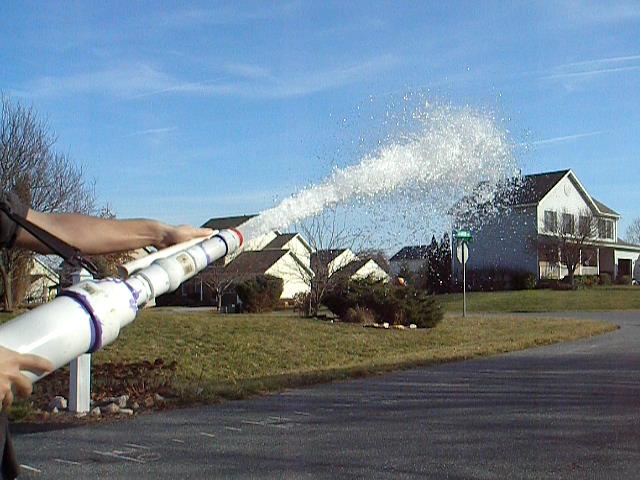
Shot images
My brother and I took some photos of Supercannon II shooting.
Performance statistics
- Effective range @ 100 PSI: 73 feet*
- Last drop range: not measured because it doesn't matter
- Effective range with 5% glycerin @ 95 PSI: 78 feet
- Water output @ 100 PSI (fire hose nozzle): 135X
- Water output @ 60 PSI (no nozzle): 542 - 812X
* I only measure the range until the end of the puddle. Most other people use last drop, which is misleading because the last drop can't soak anyone and often is 5 or more feet ahead of the puddle. That is my "effective range" measurement. The range is only useful for the part that will deposit major amounts of water... not 10 mL 5 feet ahead of that.
Comparatively, Supercannon II blows every other water gun out of the water. Supercannon II compares most closely to a fire hose. A fire hose has water output of 4.0 L/s approximately, which converts to 133X. Compare a fire hose's 133X to Supercannon II's 135X—the figures are identical! Supercannon II is a fire hose.
Performance on graphs
I realize a lot of people new to water guns might read the statistics and think "That's cool, but I don't know what's good." In the graphs below I compare the performance of Supercannon II against other popular water guns. You can see the difference in performance very clearly.
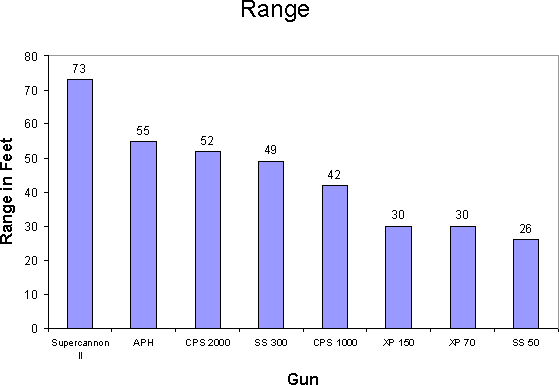
The graph above shows Supercannon II's range compared against the range of other water guns. You can easily see that it is over twice as far as most water guns, and 20 feet more than the most powerful manufactured one, the CPS 2000.
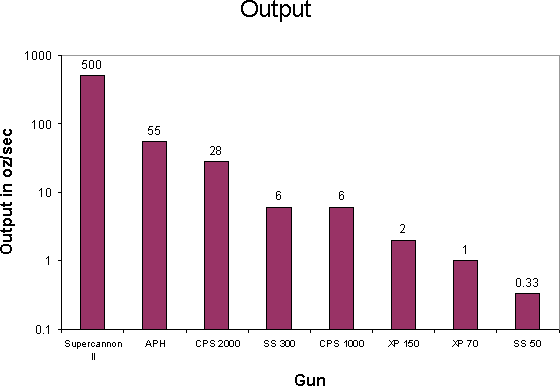
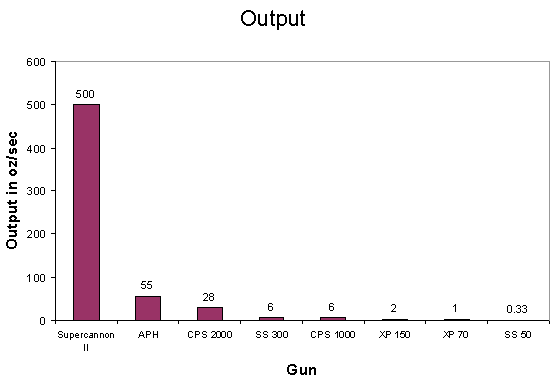
What is more startling however is the output graph. Note that the scale above is logarithmic, that is, each notch means 10 times as much as the last notch. If we did the scale with normal axises, simply put, you wouldn't be able to see the competition. Supercannon II performs at about 10 times as much flow as the APH, and 20 times as much flow as the CPS 2000. A linear-axis graph follows.
Materials
The list below is approximately what I used. You can and I do suggest making changes based upon what is available to you and what you prefer.
- 1 1/2 inch NPT female threaded PVC ball valve
- 3 1 1/2 inch NPT male threaded adapters
- teflon tape
- 2 1/4 inch 4 inch long bolts
- 2 1/4 inch washers
- 2 1/4 inch nuts
- 1/2 inch PVC pipe
- 3/4 inch PVC pipe
- 1 1/2 inch PVC pipe
- 4 inch PVC pipe (pressure rated)
- 1 1/2 inch fire hose nozzle (McMaster-Carr part number 6424T62)
- 2 Buna-N piston cups (McMaster-Carr part number 9411K28)
- 1/2 inch PVC check valve
- Male air coupler
- 2 female 1/4 inch to 1/2 inch male threaded bushing
- 1/4 inch NPT air pressure gauge
- 1/2 threaded coupling
- 1/2 inch PVC ball valve
- 2 1/2 inch male threaded adapter
- 2 1/2 inch tees
- 1/2 inch threaded female to 1 1/2 inch male bushing
- 2 1 1/2 inch female to 3 inch male bushings
- 2 3 inch female to 4 inch female reducers
- 1/2 inch bolt about 3 inches long
- 2 1/2 inch metal fender washers
- 2 1/2 inch rubber fender washers
- 2 1/2 inch washers
- 1/2 inch spacer
- 1/2 inch nut
- Vaseline (petroleum jelly)
- Loctite
The tools this water gun requires are a drill (either a hand drill or drill press will be adequate), a 1/4 inch drill bit, a hacksaw, an air compressor, a wrench, and preferably a clamp.
Construction
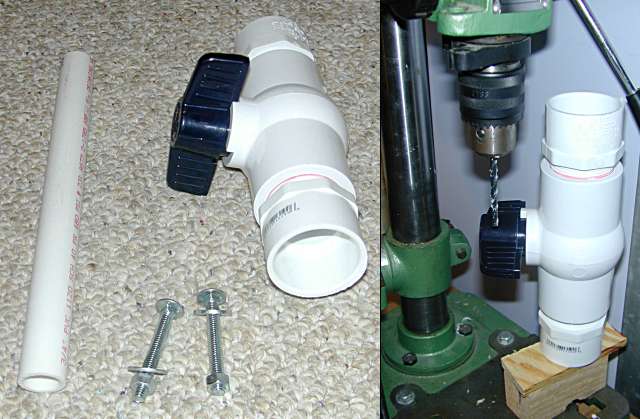
The first part of Supercannon II I constructed was the valve assembly. Brass valves are easier to open, but, they are far more expensive and heavy. I choose a plastic ball valve that would be hard to turn if I didn't add a torque arm. The torque arm makes the valve extremely easy to turn while saving some money.
To construct the torque arm, cut a length of 3/4 inch pipe as long as you want the torque arm. Get the 1/4 inch nuts, washers, and bolts and the valve itself. Drill a hole about in the center of one of the sides of the ball valve's current handle. Drill another hole near the end of the PVC pipe in the center.
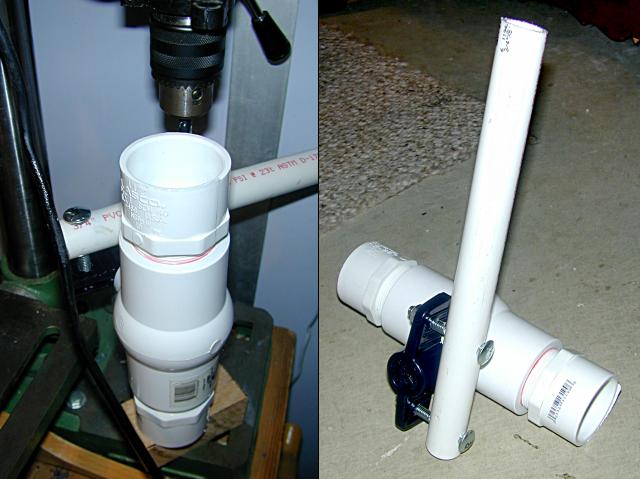
Put the bolt through the two drilled holes and use the washer and nut on the other end to put it on more permanently. This procedure allows you to make aligned holes very easily. Now, drill straight though both the PVC pipe and the ball valve's handle like you were doing both at the same time. Look at the image above if you are confused.
After drilling the holes, put the bolt, washer, and nut on to finish the handle. Tighten the nuts on pretty good, but not good enough to break the ball valve's existing handle.
To further quicken valve opening, you also can lubricate the valve with some spray silicon lubricant. Close the valve, spray the lubricant on the ball part, spread it, and open and close the valve in rapid succession to spread the lubricant over the parts of the valve. Wipe off excess lubricant.
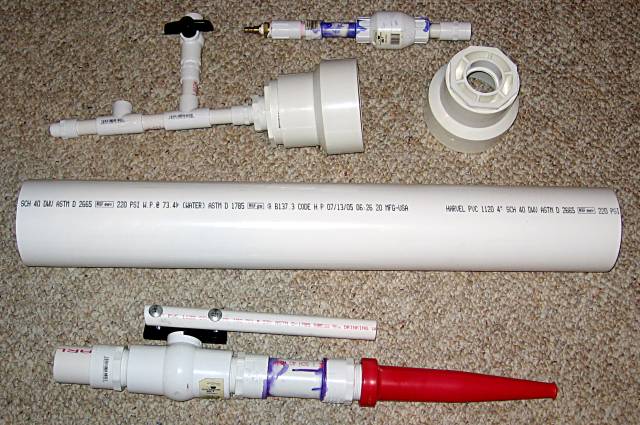
The image above shows all of the non-piston parts of Supercannon II except for the pressure gauge and the bushing used to attach it. Compared against other water guns, Supercannon II is remarkably simple in concept, involving no pump and no water reservoir.
The 4 inch PVC pipe was cut about 4 feet long. Think about how much water you want in your water tank. With a 1:1 water to air ratio, approximately half the volume of the pipe is water. Using the volume of a cylinder, you can convert accurately the volume in cubic inches to liters by dividing by 61. 4 feet gives you about 4.9 liters of water, and 5 feet gives you about 6.2 liters.
The back end of the gun is the part that fills the gun with air. The back end features a check valve with an air coupler to attach to an air compressor. The check valve lets air in one way, but not out the other way, which is what you want in a design like this. The ball valve is necessary to vent compressed air from the back of the water gun. Venting the air is necessary after shots because the piston needs to be moved to its original position. The air vent release is very loud, so I would suggest adding an air muffler like McMaster-Carr part 4450K4. The air muffler releases the air a little more slowly over a larger area, reducing the noise.
The front end of the gun contains the firing valve, the fire hose nozzle, and some PVC parts connecting them. The three 1 1/2 inch male threaded adapters all go in this part. It is possible to use a 1 1/2 inch pipe nipple instead of two of these threaded adapters to connect the ball valve to the nozzle, but I did not do that.
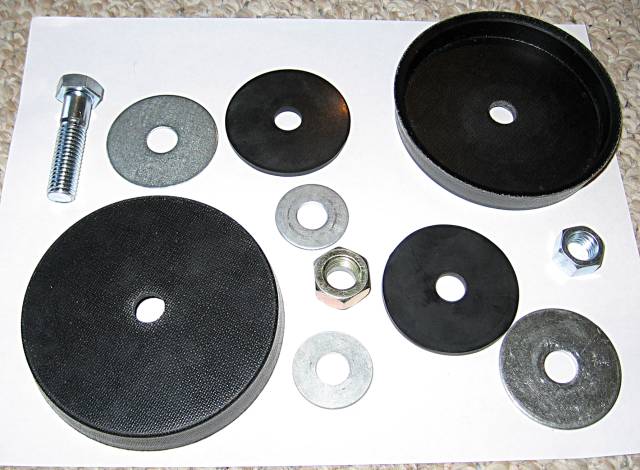
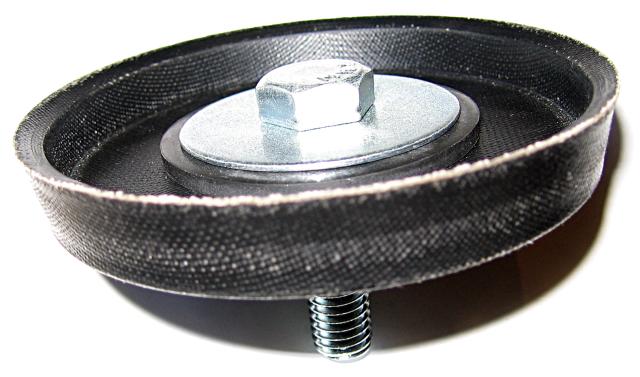
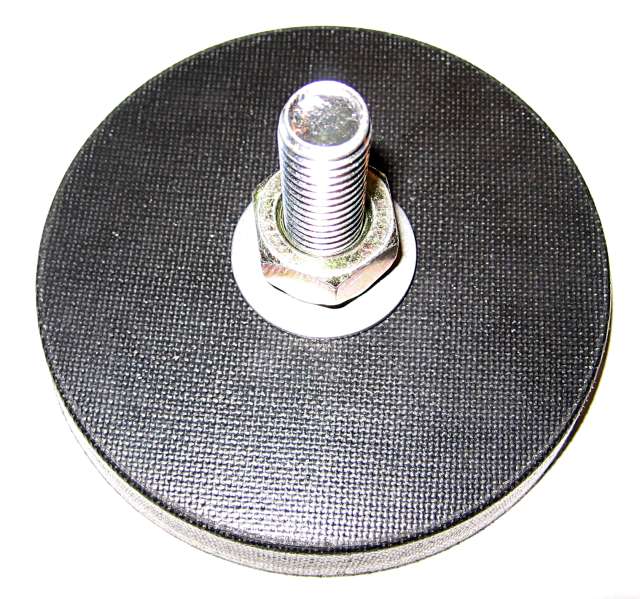
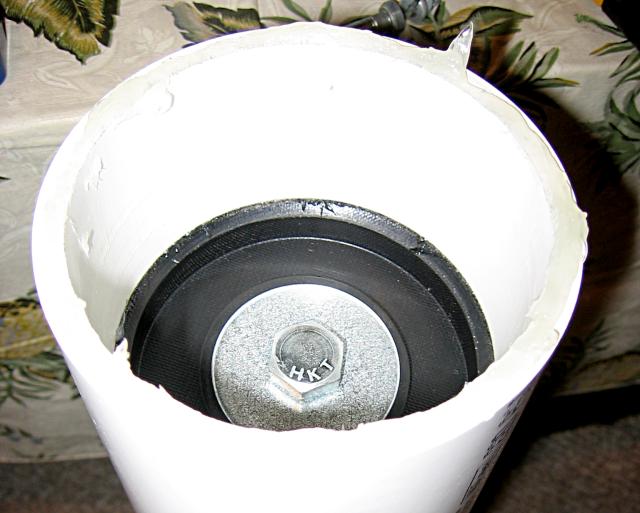
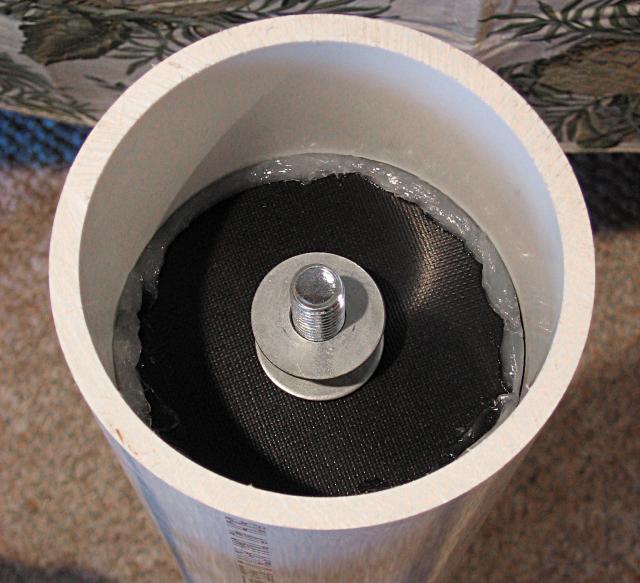
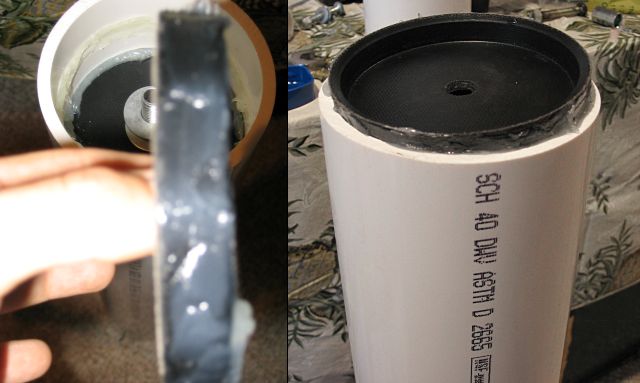
The parts above all make the piston. There are two Buna-N piston cups, two metal fender washers, two rubber fender washers, two washers, one bolt, one nut, and one slightly larger nut I used as a spacer. Larger nuts can be used as spacers, but they also make dedicated nylon spaces that would work better. The images below will show how the piston is constructed. Note that the image on the right is deceiving due to barrel distortion. The pistons themselves are straight—the lens makes them appear bent.

The finished pistons will be connected in the following order like the image above:
- bolt
- metal fender washer
- rubber fender washer
- Buna-N piston cup
- washer
- spacer
- washer
- Buna-N piston cup
- rubber fender washer
- metal fender washer
- nut
Note the orientation of the piston cups, with them pointing away from each other.
Also note that the nut should be put on with Loctite, which I will discuss more below.
In retrospect, I would suggest epoxying the head of the bolt to the metal fender washer to prevent a small potential leak through the piston at higher pressures. I have noticed a tiny bit of water that can be poured our of the air vent valve after many shots, but that may also be the result of the humidity and the compression of the air. Nonetheless, epoxying the bolt to the washer will not do any harm, so I suggest it.
Inserting the piston into the pipe can not be done with the piston constructed as is in the images above. It must be installed in parts.
The two images show how the piston should be arranged before inserting it into the pipe.
Using a popsicle stick, apply Vaseline or whatever other lubricant you have to the perimeter of the seal. Be sure to check that your lubricant is compatible with the Buna-N rubber in the piston cups.
Put the piston on top of the pipe and push it in slowly.
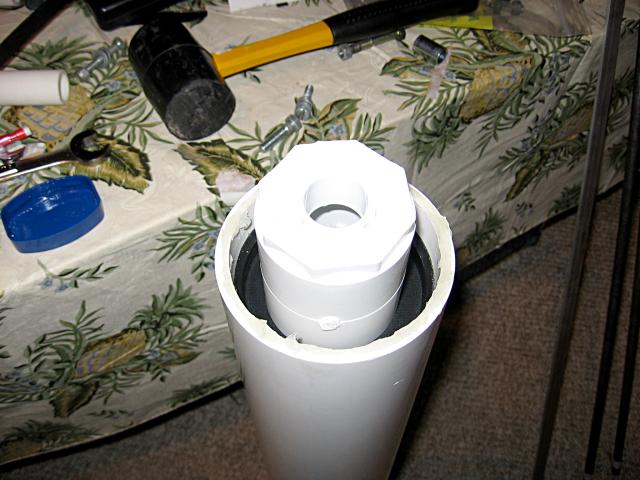
This might be a little difficult because the seal is meant to be tight, so I used an improvised piece of PVC and a rubber mallet to get the piston into the pipe.
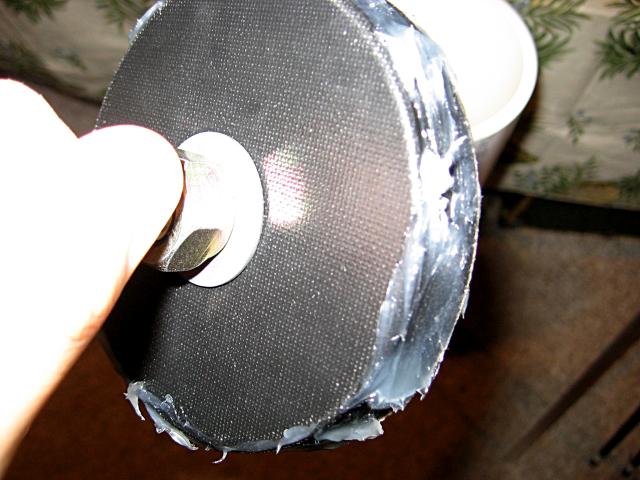
The seal is inside of the pipe. Note the excess vaseline on the perimeter of the pipe. Wipe that off. Later you should clean the entire pipe with dish soap to break up any lubricant on the pipe that may interfere with the PVC cement and primer.
Push the pipe to the other end with a stick (a piece of PVC pipe works) and flip the 4 inch pipe over. The piston is now there, but upside down. Put the washer on top of the other washer and the spacer.
Lubricate the perimeter of the piston cup and insert it into the chamber like you did previously. Also lubricate the pipe itself above the piston already in there. Look at the background of the left image to see how. Wipe off excess vaseline.
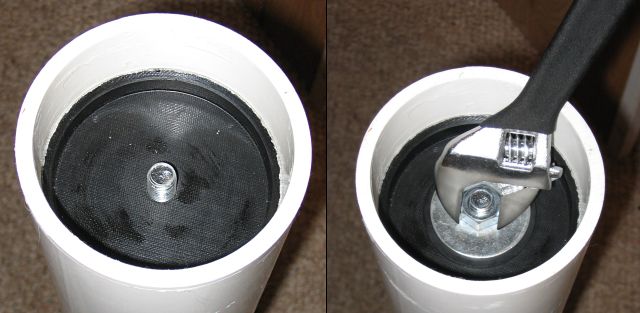
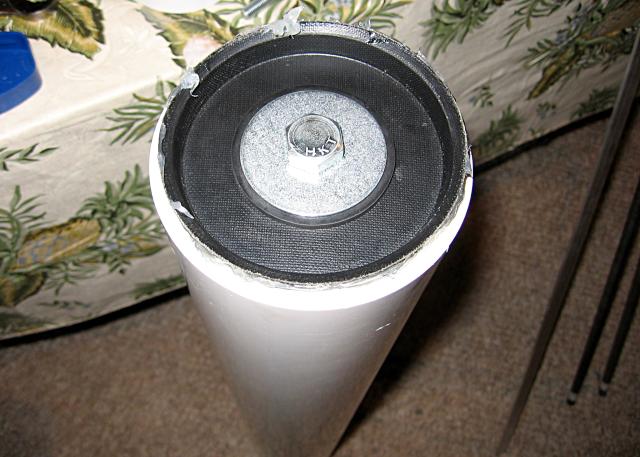
Get the hold in the center to align with the bolt so the bolt goes through it. That might take a little messy work with your hands in the pipe, but it is necessary. Afterward, put the rubber fender washer, the metal fender washer, and the nut on the bolt and tighten the nut on. You will have to hold the piston still as you use the wrench to tighten the nut. Use Loctite to ensure the nut does not move during the life of the water gun (read the package to see how).

The piston is installed. Wash off the entire pipe with water and dish soap to remove any vaseline on the pipe. Wait for the pipe to dry completely before solvent welding all of the parts together.
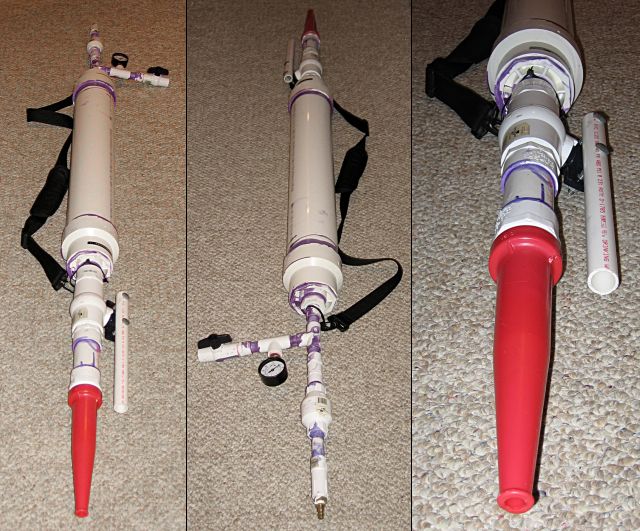
The image above is Supercannon II completed.
Filling the water gun
Due to the very simple design, filling this water gun is very different than filling other water guns. To fill, open all valves on the gun. Remove the fire hose nozzle. Get a ramrod (I used a long piece of 1 inch PVC pipe) and push the piston down to what location you want it in. I measured and put markings on my ramrod to know when to stop pushing. Close the vent valve on the back. Pour water down the open firing valve until the water is up to the threaded nozzle. Close the firing valve. Connect the air coupling to an air compressor, and pressurize the water gun. When the desired pressure is met, disconnect the coupling. The gun is now pressurized and can be fired at will.
Adding an air muffler
While an air muffler is not required for a water gun in the style of Supercannon II, you might want one to reduce the noise made when the air vent is used. The air vent is very loud—about 105 dBs. An air muffler reduces the noise level to less than 70 dBs, likely lower. I bought McMaster-Carr part number 4450K4, which reduced noise level by more than it reported it would, so I was very pleased. To install an air muffler, apply teflon tape and thread it onto the ball valve you use to exhaust the excess air.
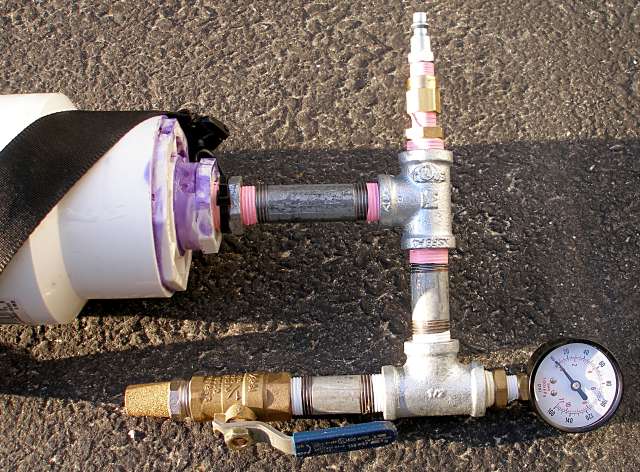
The image above shows my filling assembly about a year and a half after completing Supercannon II. I designed the assembly to be upgradeable, mainly to be able to attach regulated air output to it, but that never happened. I broke off one of the pieces of plastic pipe, so I replaced everything with metal pipe. This won't break now. You can see the air muffler on the end of the ball valve.
Photos of the completed water gun
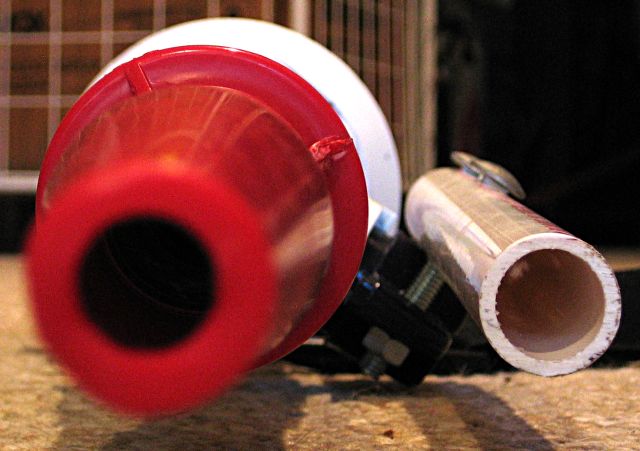
A closeup of the nozzle. You can see how big the nozzle is here. It's 1/2 inches in diameter. I did not experiment with other nozzle sizes, but I would imagine that a different nozzle size could improve this water gun's range further. The only thing that would need to be done would be drilling this nozzle larger.
These three images of Supercannon II show how long it is. When making this guide, I was having trouble finding pictures that wouldn't be obscenely long, so I simply combined them into one image. Supercannon II is over 5 feet long.
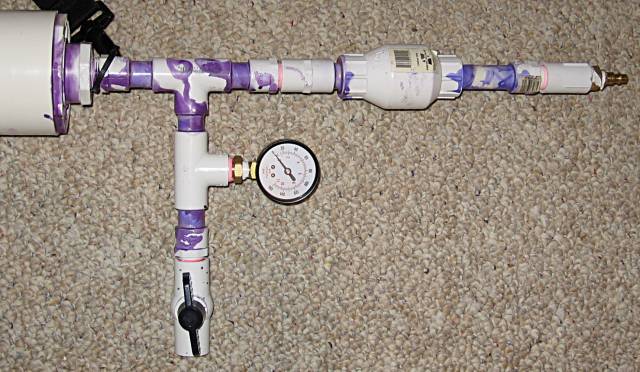
The valve assembly on Supercannon II. It shows the pressure gauge, air vent valve, and filling assembly.
Photos and videos of the water gun in action
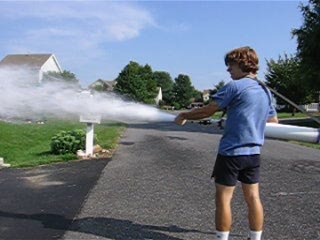
Water gunning at its best. At the time, I didn't have any higher resolution pictures. Check out our gallery for higher quality shot images.
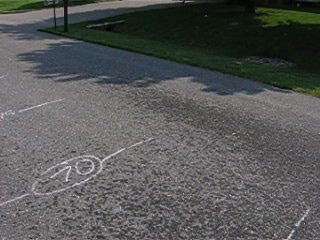
This frame from the video of the shot shows definitively that the gun could shoot past 70 feet. The gun also could shoot drops of water past 75 feet, but that range was not measured and it can not be determined by this photo because the shadow of the tree obscures the last drops.

Above is a photo of Supercannon II about a year and a half after it was built before I did a bunch of tests with it.